Tuesday, August 4, 2009

Oven Baked Spare Ribs


Recipe from Cooking for Engineers Website By a Michael Chu:

The recipe is quite simple: mix 18 oz. of barbeque sauce (1 bottle) with 1/2 cup orange juice. Pour into a 9x13 pan. Place ribs in pan and flip using tongs so ribs are coated. Cover tightly with aluminum foil and bake in a 300°F oven. Total cooking time can be as short as 2 hours or as long as 4 hours. Flip ribs over halfway through cooking.


Cooking the ribs for 2 hours will result in meat almost falling off the bones. If you cook for four hours, the ribs may be hard to lift out of the pan because the meat will be on the verge of falling off the bones under slight pressure. The cartilage will also be soft and practically melt in the mouth.

After the ribs are done cooking, remove the aluminum foil and continue to cook for about 10 min. per side to thicken the sauce.

Jaden Review:
The ribs were tender and tasted ok, but I am not a huge rib fan. I just wanted to cook something for dinner and mom found this recipe. It was easy to make other than mom had to flip them, and As always I do not like touching the raw meat. I think would have been better without the bbq sauce. I like pork just seasoned. I give this a 3 star.

Mom Review:
OK, I thought these turned out great. Very tender and very easy! I went looking for an easy ribs recipe that Jaden could cook most all herself and I was not disappointed with this one. She really liked the idea that she had cooked dinner herself for everyone. Only thing I did not like is it does not give a good idea of how many ribs this recipe is for, we think we had more than what this recipe called for because I had to cut the ribs in half and have Jaden overlap them a little, but still the recipe worked. We did have to drain the liquid near the end before taking the foil off during the last 20 minutes and then I had Jaden add extra sauce and broil them to try to bake the sauce in better. Overall though. This recipe worked great and was so easy. I think I will be using it from now on. I give it 5 stars!

Cleanliness:
Seriously? It is ribs! Have you or anyone else you know ever been able to eat ribs and stay clean? Keep the roll of paper towels close as well as a bowl of water to wash off with!

Monday, July 27, 2009

Reese's Dessert Bar Mix No Bake


Store Bought Box Recipe made by Betty Crocker:


Everything is included in the box except Butter/Margarine and water.


For crust:

1 tablespoon water

2 tablespoons butter, Margarine or spread*; softened


For Filling:

1/4 Cup (or 1/2 stick) butter, margarine or spread*


* If using spread, use one that has more than 65% oil.


1. Place topping pouch in a bowl of hot water (do not microwave pouch); set aside.

2. Measure water and 2 tabelspoons softened butter in medium microwaveable bowl; add crust Mix (do not stir). Microwave uncovered on high 45 seconds. Stir with Fork until mix is moistened. Press firmly and evenly in ungreased pan (included).

3. Melt 1/4 cup butter in medium microwavable bowl on high about 15 seconds. Stir in filling mix and peanut butter until well mixed. Press evenly on crust.

4. Squeeze topping pouch 10 seconds. Cut off top of pouch. Squeeze and spread topping evenly over filling. Refrigerate 30 minutes. Cover and refrigerate leftovers up to 2 days.


The box claims this make 15 servings.


Jaden Review:

This was easy to make and fun. It tasted a little too peanut buttery and not enough chocolate. Overall not bad. 3 stars because of not enough chocolate and too much peanut butter.


Mom Review:

We decided to do a review of this recipe because we had seen many people on the internet say this would be great for kids, and we figured with everything included in box it would be quick and easy since no bake recipe. This was quick and easy other than it says 30 minutes in fridge, but we had to leave it in at least 1 hour to get it to firm up and not be too messy. The recipe could have used more chocolate topping. We had trouble getting the topping included in the box to actually cover the whole dessert. Which I also need to add that the pan they show on the front of the box looks way bigger than the actual pan. Pan is about size of box, so rather small which then makes it even funnier when they say that this has 15 servings. Those are some small servings. Finally we get to the taste. I honestly really liked it. Could have used more chocolate like Jaden said, but if you like peanut butter cups you will like this dessert. The dessert is VERY rich which makes the 15 servings a little more realistic. I could not eat too much or I would get a sugar overload. Overall I give it a 4 star due to kid friendly cooking and taste.


Cleanliness:

Easy clean up especially since pan is included and we only had to use one bowl, a fork, and a wooden spoon. As far as eating it the older kids and adults had no problem, but our 2 year old Clean O' Meter Willow was another story. Chocolate and peanut butter in her hands ended up everywere and she finally asked for help eating it, and apparently it was not to rich for her because she kept asking for more.

Sunday, July 26, 2009

Fruity Punch


Recipe by Kids in the Kitchen:

1 scoop raspberry sherbert
1/2 cup pineapple juice
1/2 cup 7-up or Sprite

1. Place rasberry Sherbert in a drinking glass
2. Pour pineapple Juice and Sprite/7-Up.
3. Let Sherbert melt a little, then serve.

Makes 1 serving

Jaden Review:
Liked it a lot. Even made a second one. Much better than last drink I tried from same book. Reminded me of a rootbeer float but fruity. I could really taste the sherbert. 4 stars


Mom Review:
This was way better than last drink Jaden made! I could see this being a good kid party drink. Jaden chose to use Sprite instead of 7-Up and it turned out good. I even tried to add a Cherry to add to the look but kept falling over and that is the red at the bottom of the glass in the picture, LOL. Overall, everyone wanted more, so I call this a success and thinking of using it for my son's birthday party in a couple weeks. This one actually could possibly combine as an adult party drink with possibly a little rum or vodka. Wish I had alcohol in my house to try out that theory, LOL. I give it a 4 stars also.

Friday, July 24, 2009

Best Chocolate Chip Cake


Recipe by Busy Mom's Cookbook:

1/4 cup oil
1 box chocolate cake mix

1 1/4 cup water

2 lg. eggs

1 (3-oz) pkg. instant chocolate pudding mix

1 Cup semi-sweet chocolate chips
whipped topping or frosting (optional)

Adult Help: with oven


Pour oil into a 9 x 13-inch pan. Put cake mix, water, eggs, pudding mix and chocolate chips into pan in that order. Mix the ingredients thoroughly with a fork. Spread the batter evenly in the pan and bake at 350 degrees for 35 - 40 mins or until toothpick inserted in the center of the cake comes out clean. Allow the cake to completely cool before unmolding or serve warm from the pan with whipped topping.


Jaden Review:
Awesome, awesome, awesome! Lots of chocolate. I loved it! Not to hard to make either. 5 stars +

Mom Review:
The only thing I found strange about the recipe is that they want you to mix the ingredients in the pan and they do not ask you to grease the pan other than maybe the small amount of oil that you first put in but that is not going to grease the pan. So Jaden followed the directions which is what we want to do. The cake I have to admit taste awesome. Very moist and chocolate and easy to make. The mix it in the pan thing saves on dishes, but the lack of greasing the pan now has me dreading having to wash the pan. It will need some scrubbing. Next time we try this recipe we will be greasing the pan first. Other than that I have no complaints on the taste! It was awesome! I give it 5 stars also.

Cleanliness:
The mixing all in one pan saved on dishes and clean up. That is a plus. Our Clean O'Meter Willow on the other hand was a mess after eating the cake, but what child isn't when you serve cake?

Thursday, July 23, 2009

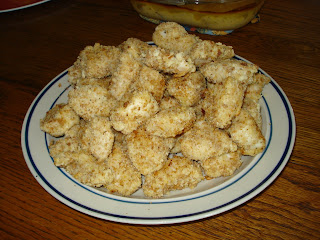
Homemade Chicken Nuggets


Recipe from Kids in the Kitchen:

1 3/4 cup herb-seasoned crumb stuffing mix

1/4 cup grated Parmesan cheese

3 Tablespoons Margarine, melted
1/4 Cup lowfat buttermilk

1/4 tsp pepper
2 boneless, skinless chicken breasts, diced

1. Place stuffing mix into a resealable plastic bag. Seal and crush crumbs with a rolling pin.

2. Add Parmesan cheese. Reseal bag and shake mix

3. In a medium size bowl, Place margarine, buttermilk and pepper; stir well.

4.Dip each chicken piece into buttermilk mixture, covering all sides. Place 3 pieces at a time into bag of crumbs. Seal bag tightly and shake until chicken pieces are evenly coated with crumbs.

5. Place coated nuggets on an ungreased baking sheet.

6. Bake at 450 degrees for 4 minutes. Remove from oven and turn each nugget.
7. Return to oven and bake 4 - 5 minutes or until golden brown.


Serving size 2 to 3


Adult help: Assist with dicing chicken and using oven.

Jaden Review:
This one was slightly difficult because of the coating. It was icky feeling to touch the chicken raw then put in the liquid, then in the crumbs. I managed to do all of it but the dicing of the chicken but was a little tired by time it was done. It tasted really good other than a little funny aftertaste which mom and Jerry said was the Parmesan cheese. Overall really good though! 4 Star

Mom Review:
Some parts were slightly difficult for kids to cook, especially young kids, but Jaden at 11 did really well AND the end result was Awesome! Jaden did not care completely for the Parmesan but I thought it was great. The chicken was very tender and from a moms perception everyone ate it without real complaint! I give this one a 5 star!

Cleanliness:
Ok, lets look at this recipe realistically! Do you think it was clean when being made by a child? Stuffing crumbs, buttermilk mixture, and raw chicken being shaken don't make for a clean kitchen so be prepared mom! Jaden is being taught how to clean up the cooking mess, but really? I had to come back in and sweep and scrub. As far as eating it though, our Clean O' Meter Willow, age 2, only had problems with the sauce making a mess and she actually ate it!!! Willow never eats meat! This goes to prove that this recipe could work for adults to cook also!


Peanut Butter Shake

Recipe from Kids in the Kitchen:

1 Cup Milk

1 Banana, peeled and sliced

1 Tablespoon peanut butter
1. Place all ingredients into a blender

2. Put lid on tight
3. Blend until smooth

4. Poor into a glass and enjoy

Makes 1 serving


Adult Help: Help running blender for small children.


Jaden Review:
Not too bad but needs more peanut butter. Little too much banana taste and not enough peanut butter. Had to put into fridge to get it cold again after being in blender. Decided to give the rest to Willow and I just got the peanut butter and crackers out instead. 2 stars

Mom Review:
ICK... Blah....SPIT. Someone give me a beer to wash this taste out of my mouth ASAP..... Aaahh, that's better! Oops, kids blog, I meant a root beer. Well I think that sums it up for me. Maybe if there had been some ice cream in it? I will give it 1 star for simple fact I am sure I will taste worse at some point of all this and I will reserve 0 star for those.

Cleanliness:
It was easy cleanup other than the fact that Willow pushed hers away and spilled it. I am guessing her rating of this drink is low too.

Rabbits In A Hole AKA Egg In A Basket


Recipe from Kids in the Kitchen:

1 slice bread

1 egg

2 tbs butter

salt & pepper, to taste


1. Lightly butter both sides of bread.

2. Make a hole in the bread by stamping out a circle using a drinking glass or a round cookie cookie cutter.
3. Melt 2 tablespoons butter in a skillet and place the bread in the skillet.

4. Crack egg into the hole of the bread.
5. Fry until egg is firm, then flip. Salt and pepper to taste.


Makes 1 serving


Adult Help: Assist with using the stove.


Jaden Review:
This was easy other than the flipping part. They also did not say what to put temperature of stove at so mom said try about a medium. At first I though the egg should be scrambled so I tried that and was ok, but bread burnt before egg cooked when we had to flip it. Then we tried another one without scrambling egg and that turned out much better, but the yoke in the middle was still soft and I don't like that to well. Over all tasted good. I give a 3 star.

Mom Review:
I really thought the name they gave this was cute and got the kids' attention, though I have always known it as egg in a basket. I agree with Jaden on this being a simple recipe other than I did have to flip for her but I am guessing she could do it next time she tries the recipe. The first way she did it I knew was wrong but sometimes we have to allow mistakes, you never know what new recipe you can get from a mistake. The first one was actually not bad, just tasted like french toast. The second time it was done correctly and I would definitely like her to make it again for us sometime. I personally like my eggs over easy so I give this a 5 star in my book.

Cleanliness:
Easy clean up for this recipe and our Clean O' Meter Willow, age 2, was not a complete mess by the time she got done eating hers.